
0x01 环境准备
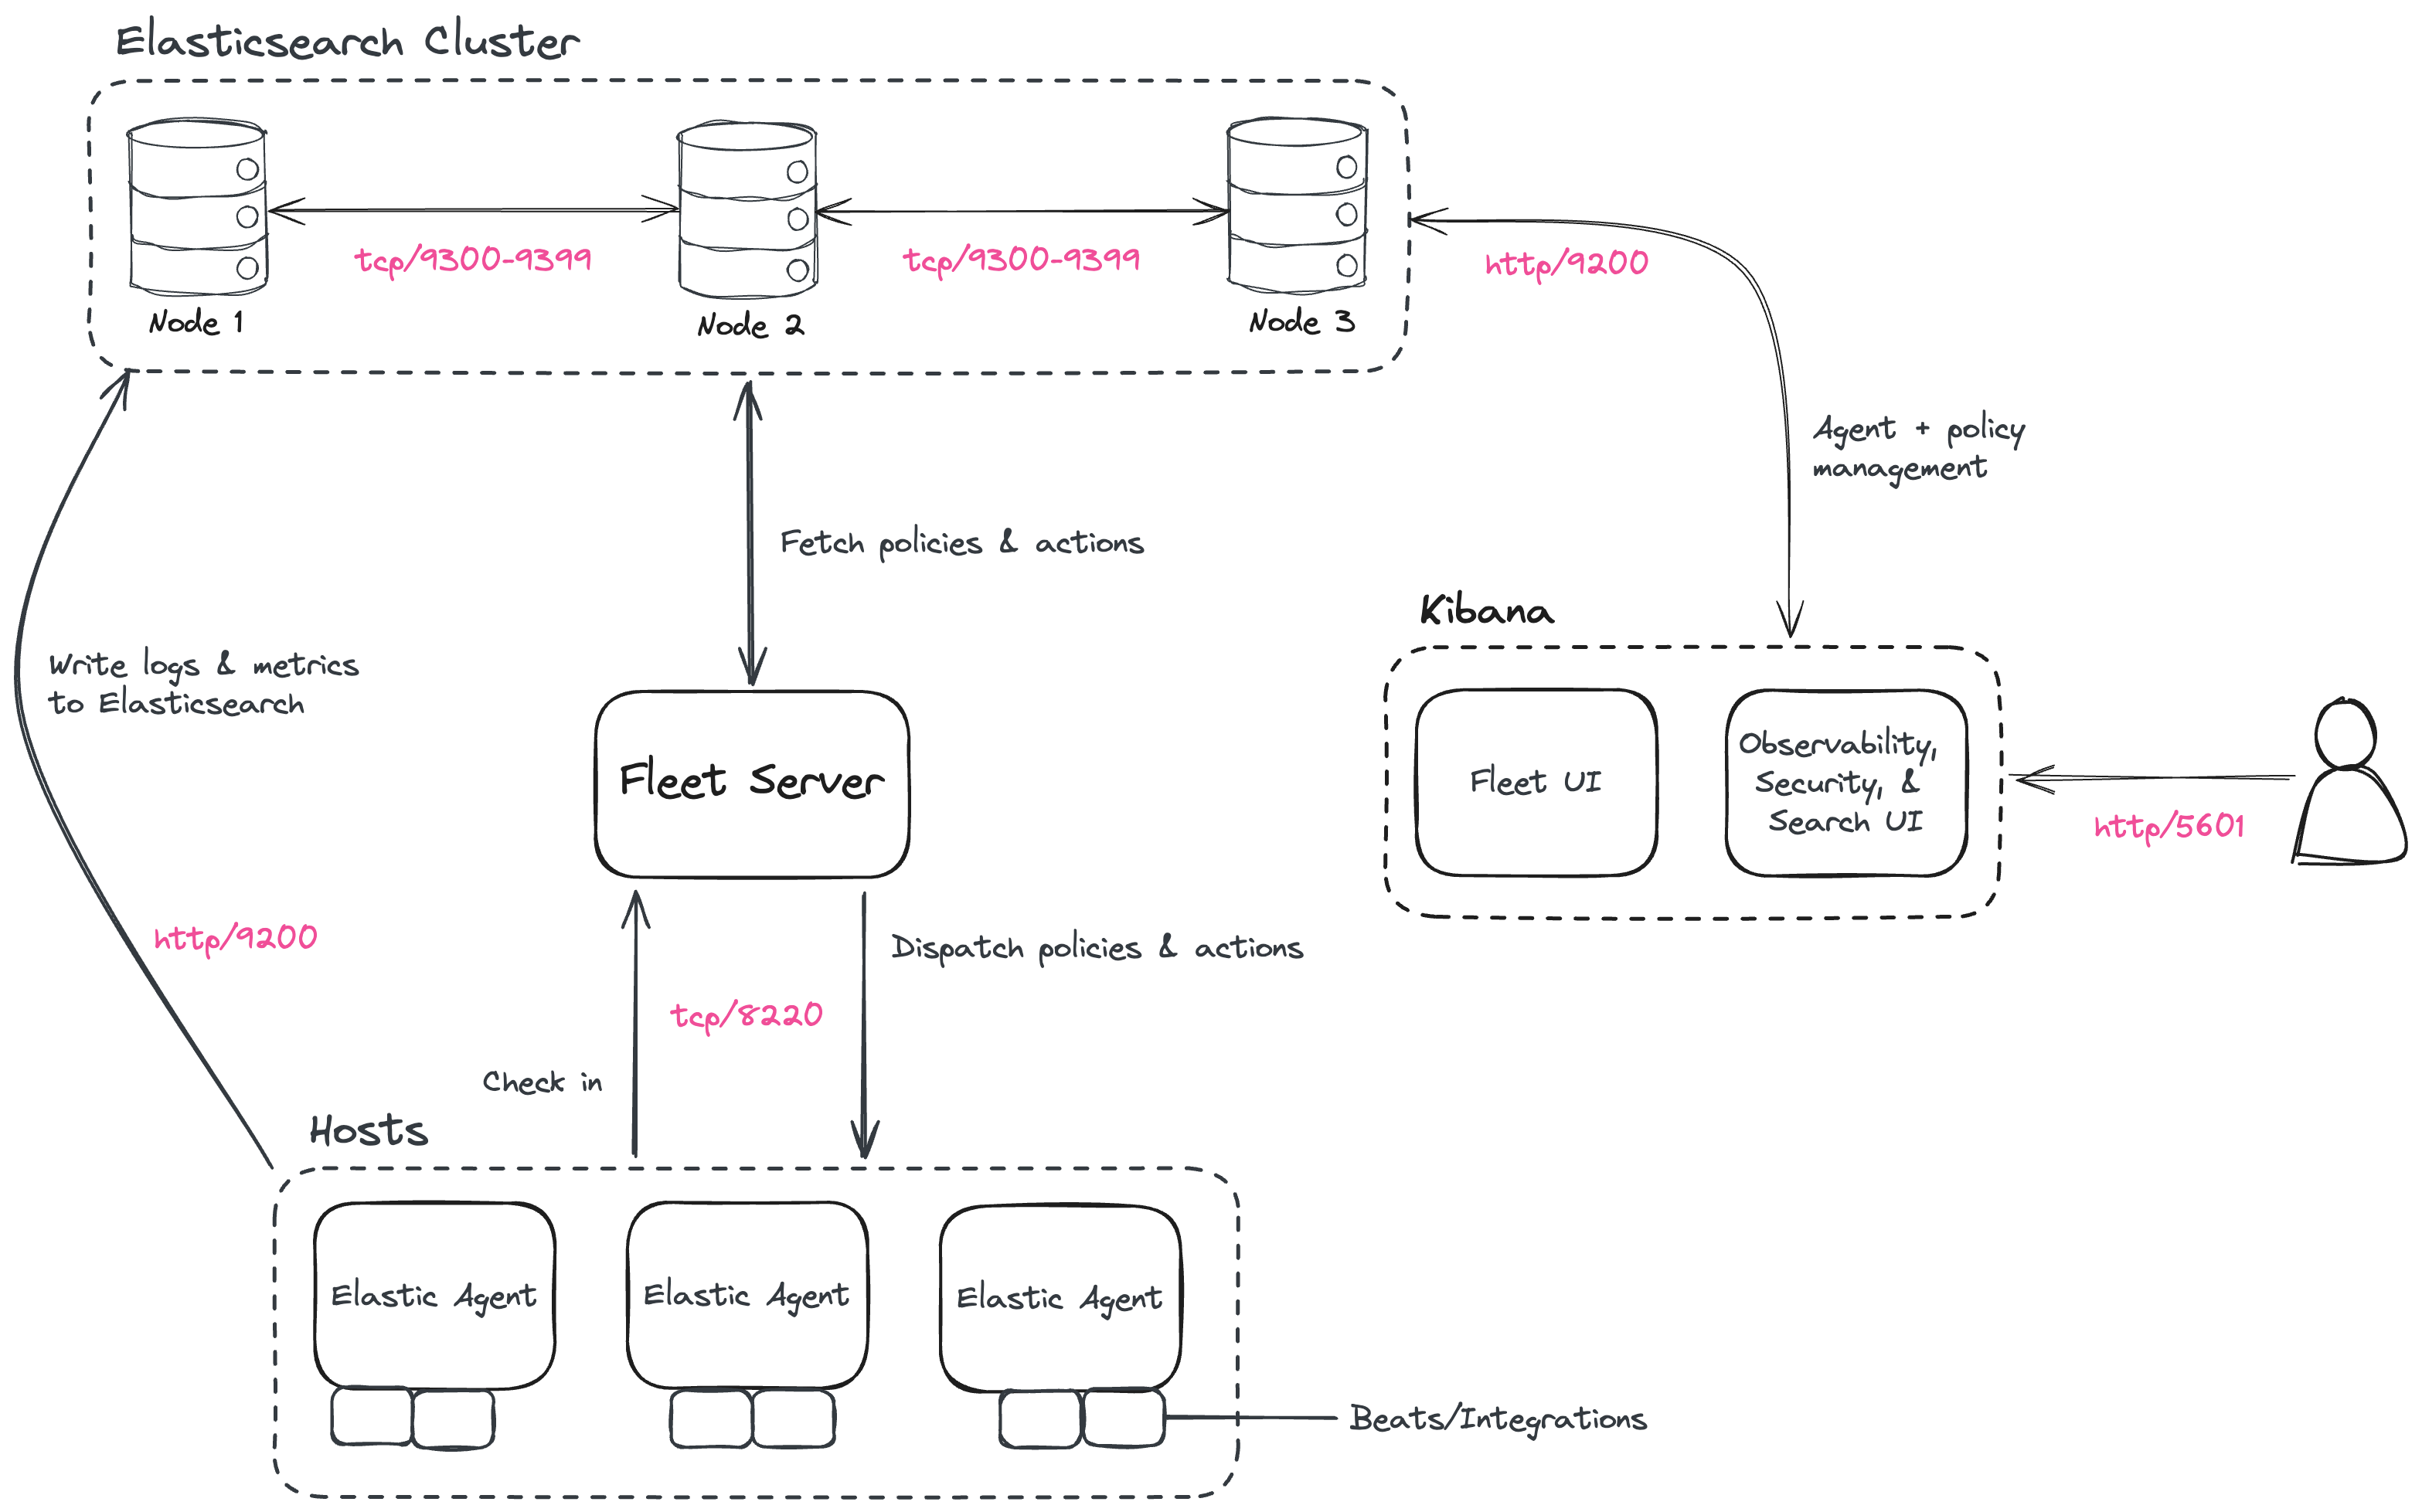
注意服务器上需要对这些端口进行开放
1.1 安装es集群
安装环境为`rocky 9.6`版本系统
1、安装第一台节点
下载安装包并安装
wget https://artifacts.elastic.co/downloads/elasticsearch/elasticsearch-8.14.3-x86_64.rpm
rpm --install elasticsearch-8.15.2-x86_64.rpm
完成安装
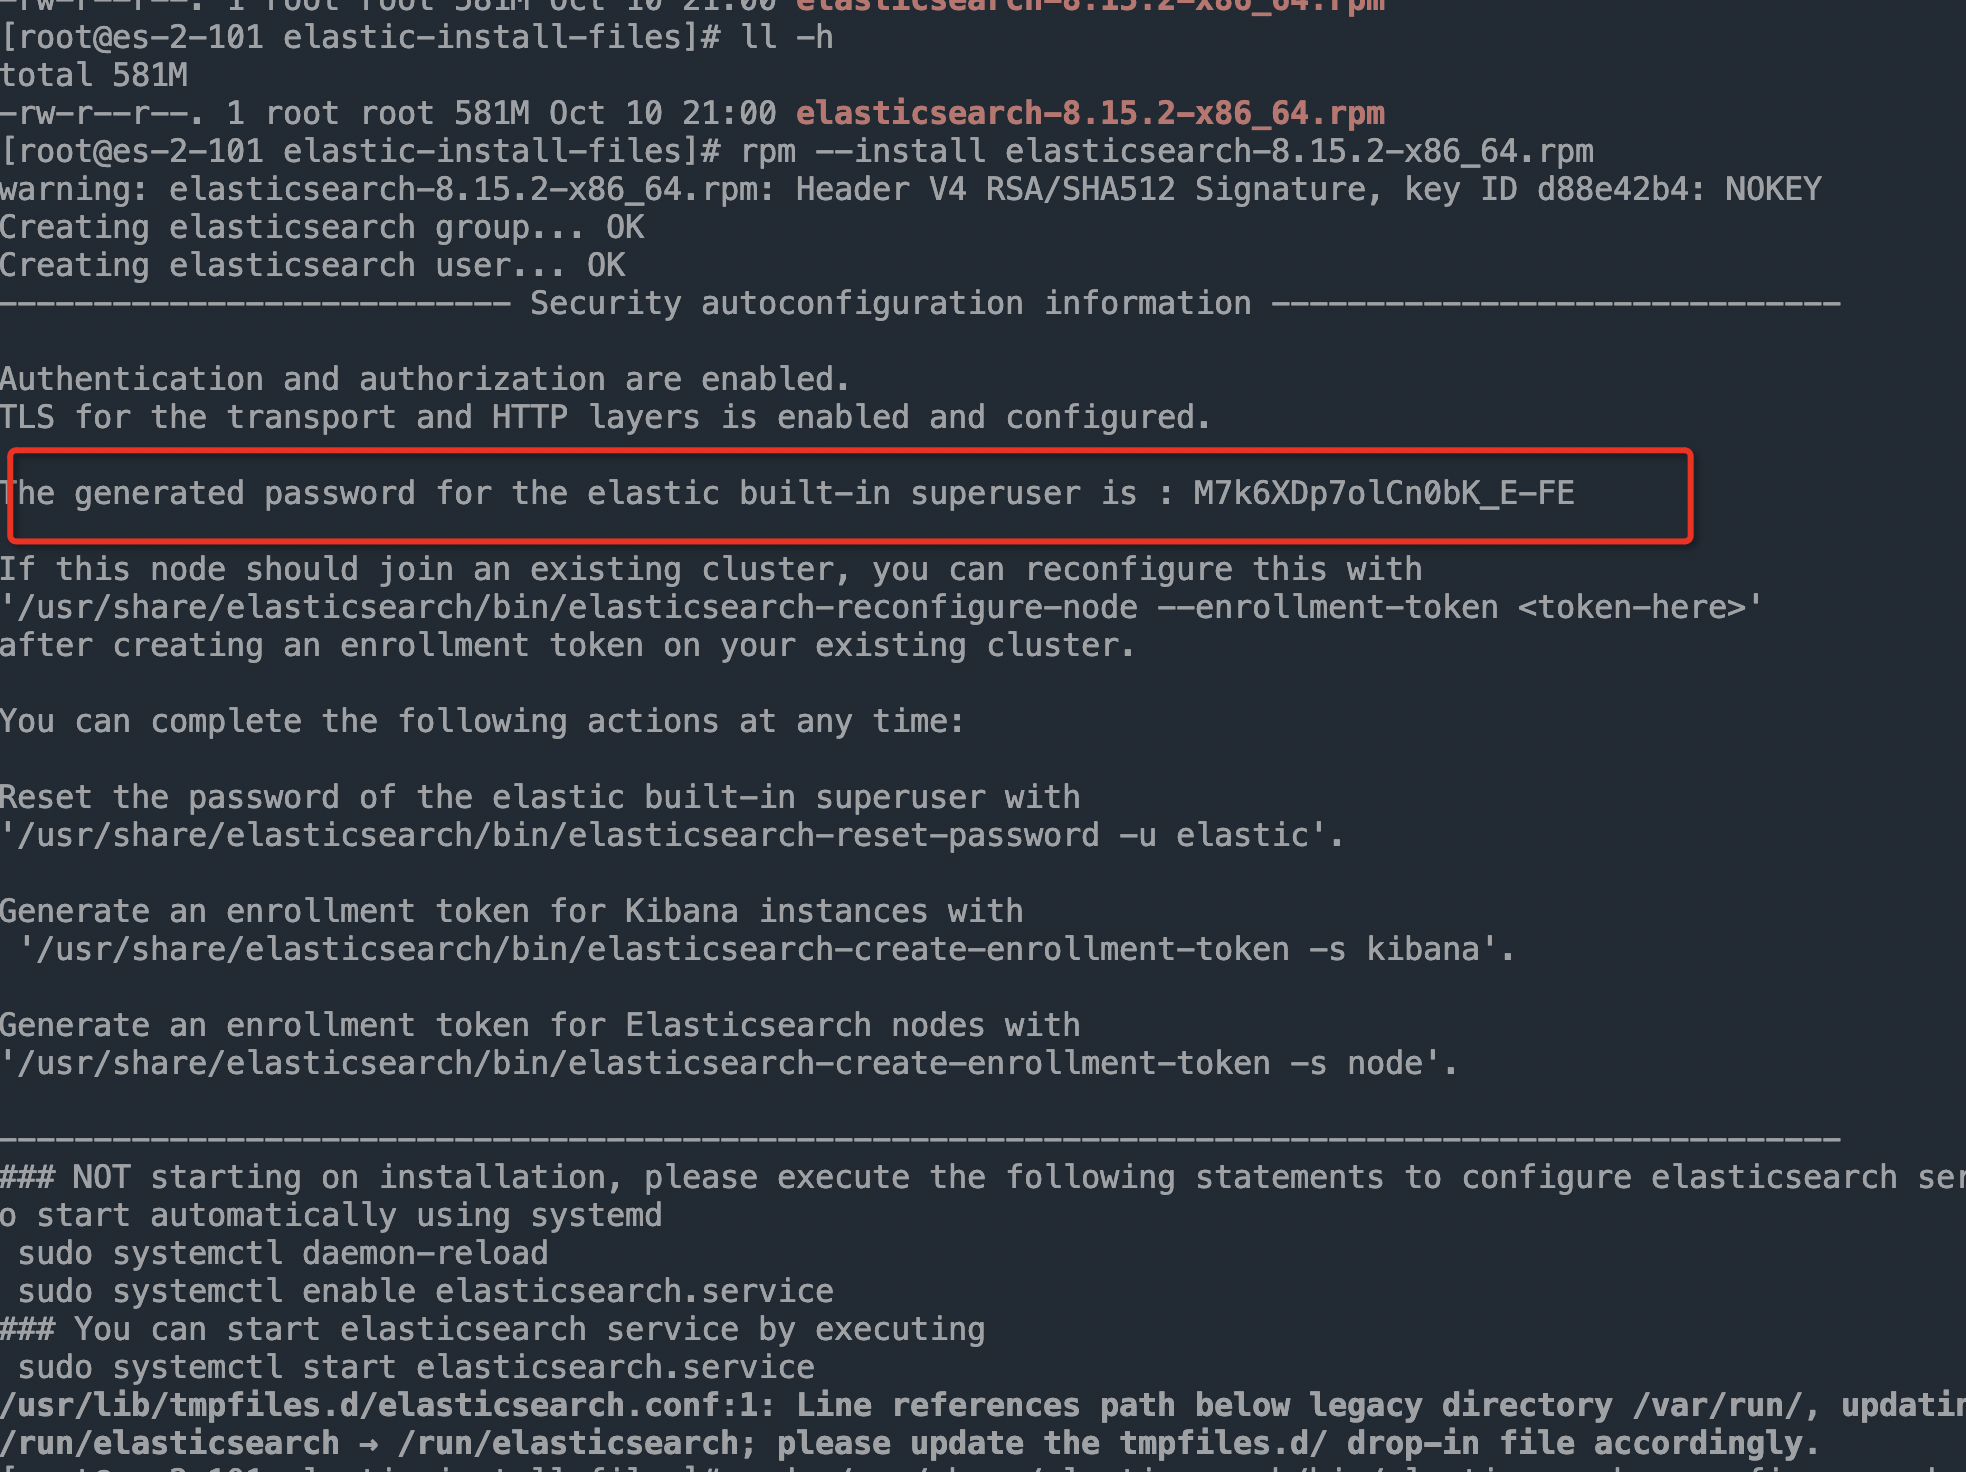
红框中的是超级用户elastic的登录密码,因为这是集群的第一个节点,后续就是集群的密码了。
设置开机自启
sudo systemctl daemon-reload
sudo systemctl enable elasticsearch.service
设置配置文件
sudo vim /etc/elasticsearch/elasticsearch.ymlcluster.name: sec # 设置集群名称
node.name: node-1 #设置节点名称
network.host: 10.0.2.101 # 设置此节点的 HTTP 和传输流量地址。该节点将绑定到该地址,并将其用作其发布地址。接受 IP 地址、主机名或特殊值。。(设置节点IP地址,主要是节点之间通信使用,如果非集群配置则可以设置为本地地址.)
transport.host: 0.0.0.0 #设置此节点的传输流量地址。该节点将绑定到该地址,并将其用作其传输发布地址。接受 IP 地址、主机名或特殊值。仅当您需要对传输和 HTTP 接口进行不同配置时才使用此设置。默认是network.host的值
cluster.initial_master_nodes: ["10.0.2.101"] # 基于此节点创建一个集群启动
sudo systemctl start elasticsearch.service
sudo systemctl status elasticsearch
测试是否连接成功
sudo curl --cacert /etc/elasticsearch/certs/http_ca.crt -u elastic:*0+do0sMlJIdI9MjY9I1 https://localhost:9200
2、安装第二台节点
下载安装包并安装
wget https://artifacts.elastic.co/downloads/elasticsearch/elasticsearch-8.14.3-x86_64.rpm
rpm --install elasticsearch-8.15.2-x86_64.rpm
完成安装,因为这是集群的第二个节点,这里显示的密码就可以不用管了。
设置开机自启
sudo systemctl daemon-reload
sudo systemctl enable elasticsearch.service
加入集群
返回第一个节点,执行如下命令获取节点注册token(该token的有效期只有30分钟,过期需要重新生成)
sudo /usr/share/elasticsearch/bin/elasticsearch-create-enrollment-token -s node
成功获取token后, 在返回第二个节点进行操作,执行如下命令
sudo /usr/share/elasticsearch/bin/elasticsearch-reconfigure-node --enrollment-token <enrollment-token>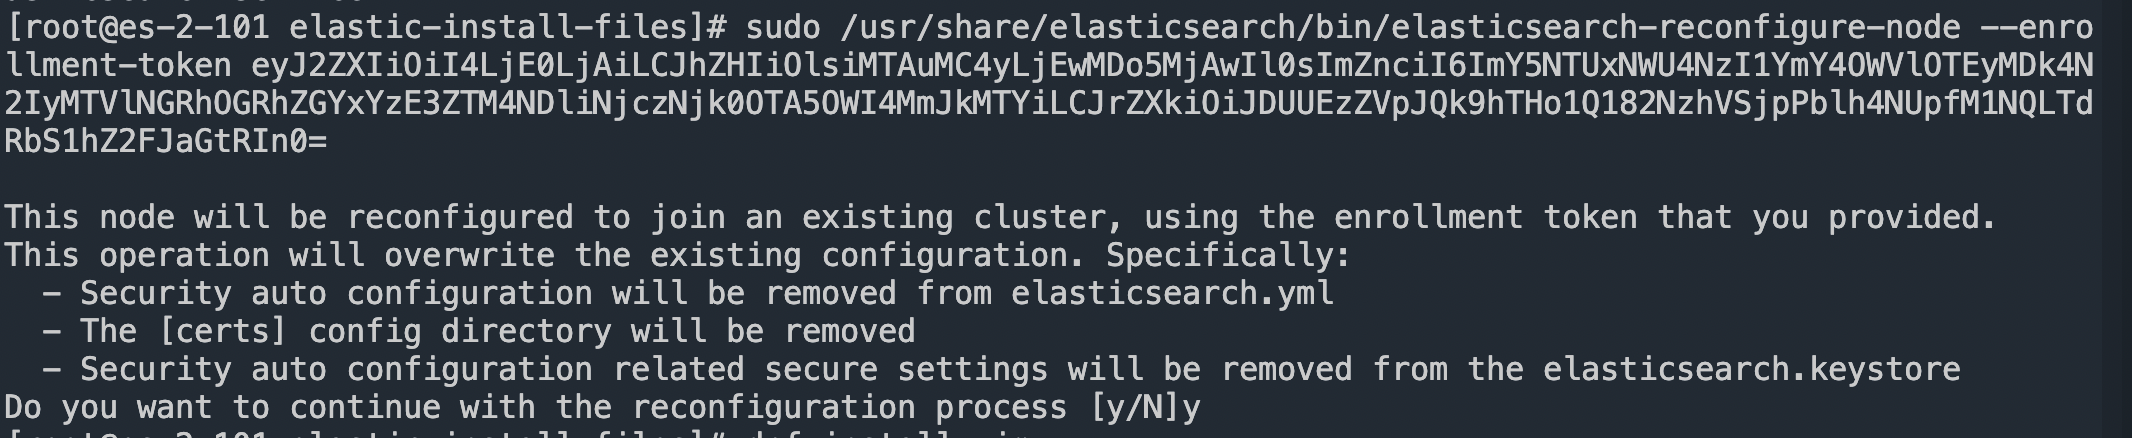
修改配置
因为是第二个节点,配置修改相对于第一个节点有些许不同
vim /etc/elasticsearch/elasticsearch.yml
cluster.name: sec
node.name: node-2
network.host: 10.128.0.132
启动服务
systemctl start elasticsearch.service查看服务是否成功加入集群
sudo tail -f /var/log/elasticsearch/sec.log # sec表示集群名称访问是否成功
ELASTIC_PASSWORD为第一个节点的密码
curl --cacert /etc/elasticsearch/certs/http_ca.crt -u elastic:$ELASTIC_PASSWORD https://localhost:92003、 新增更多的节点
参考第二台节点的安装方法进行修改
1.2 安装Kibana
下载并安装
wget https://artifacts.elastic.co/downloads/kibana/kibana-8.15.2-x86_64.rpm
rpm --install kibana-8.15.2-x86_64.rpm
Kibana服务配置
sudo systemctl daemon-reload
sudo systemctl enable kibana.service
修改配置文件
vi /etc/kibana/kibana.yml
server.host: 10.0.2.105 # 服务器IP地址,0.0.0.0也可以
xpack.encryptedSavedObjects.encryptionKey: "你的32字符以上的加密密钥" # 这个如果不设置每次启动 Kibana 时都会生成一个新的加密密钥用于加密保存的对象
i18n.locale: "zh-CN"
xpack.reporting.roles.enabled: false
xpack.security.encryptionKey: *
xpack.encryptedSavedObjects.encryptionKey: "*"  # 添加32持久秘钥
xpack.alerting.rules.run.alerts.max: 10000 #每条规则每次运行最大产生的告警数
xpack.reporting.roles.enabled: false
启动服务
systemctl start kibana.service
systemctl status kibana
在浏览器中输入地址访问Kibana
http://10.0.2.105:5601正常情况下会看见一个需要输入token的网页
接入es集群
在之前的es节点中,运行如下命令,获取Kibana的注册token
/usr/share/elasticsearch/bin/elasticsearch-create-enrollment-token -s kibana将这里获取的token输入到Kibana的网页中,识别成功后,Kibana会要求你输入验证码
查看验证码
在Kibana的服务器中执行如下命令
/usr/share/kibana/bin/kibana-verification-code 会产生一个6位的验证码。
用户名为elastic的超级用户的用户名和密码
1.3 证书安全
以上步骤都是使用的es提供的签名证书, 如果我们需要在生产环境中进行部署,则需要对这些证书进行修改。
参考Securing a self-managed Elastic Stack
建议这个步骤在安装es和Kibana之后,在安装fleet server前完成
为了对 Elasticsearch 集群节点之间以及 Kibana 和 Elasticsearch 之间的流量进行加密,必须为传输(Elasticsearch 节点间通信)和 HTTP(用于 Elasticsearch REST API)层创建 SSL 证书。同样,在设置 Fleet Server 时,您将生成并配置新的证书捆绑包,然后 Elastic Agent 使用生成的证书与 Fleet Server 和 Elasticsearch 进行通信。设置过程如下:
生成自签名CA证书
为传输层生成新证书
为HTTP层生成新证书
在es节点上配置安全性
为Kibana生成服务端和客户端证书
为fleet server配置SSL证书
安装elastic agent
生成自签名的CA证书
在 Elasticsearch 集群中的第一个节点上,停止 Elasticsearch 服务:
systemctl stop elasticsearch.service使用自带的程序生成证书
/usr/share/elasticsearch/bin/elasticsearch-certutil ca -pem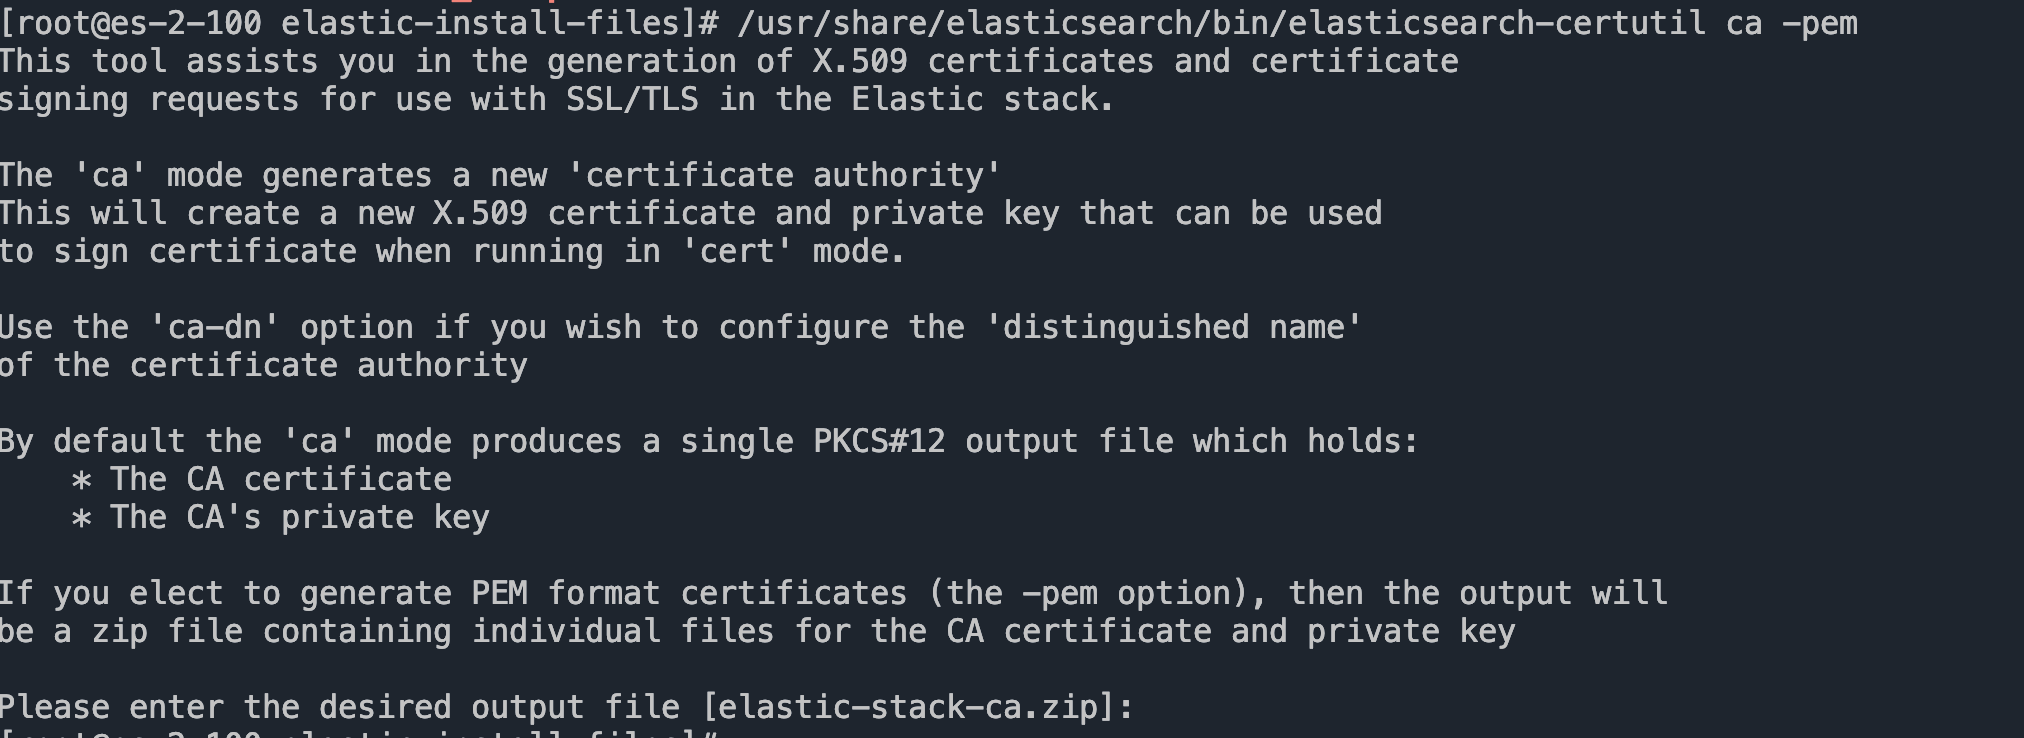
将该zip文件移动到`/etc/elasticsearch/certs`目录
mv /usr/share/elasticsearch/elastic-stack-ca.zip /etc/elasticsearch/certs/解压该文件,会生成一个文件夹
cd /etc/elasticsearch/certs/
unzip elastic-stack-ca.zip
ca.crt 自生成的CA证书
ca.key CA证书的私钥
生成新的自签名 CA 证书的这些步骤只需在第一个 Elasticsearch 节点上完成。其他 Elasticsearch 节点使用相同的文件即可。
运行keytool命令,为truststore替换一个密码
/usr/share/elasticsearch/jdk/bin/keytool -importcert -trustcacerts -noprompt -keystore /etc/elasticsearch/certs/elastic-stack-ca.p12 -storepass [1qaz@WSX] -alias new-ca -file /etc/elasticsearch/c
erts/ca/ca.crt
查看是否替换成功
cd /etc/elasticsearch/certs/
/usr/share/elasticsearch/jdk/bin/keytool -keystore elastic-stack-ca.p12 -list
给传输层生成新证书
基于上面创建的ca证书和key创建传输层的证书,然后将该证书移动到
/etc/elasticsearch/certs目录下
/usr/share/elasticsearch/bin/elasticsearch-certutil cert --ca-cert /etc/elasticsearch/certs/ca/ca.crt --ca-key /etc/elasticsearch/certs/ca/ca.key
# 移动
mv /usr/share/elasticsearch/elastic-certificates.p12 /etc/elasticsearch/certs/
按照提示输入密码后,完成文件生成.

修改
/etc/elasticsearch/elasticsearch.yml配置文件
# Enable encryption and mutual authentication between cluster nodes
xpack.security.transport.ssl:
  enabled: true
  verification_mode: certificate
  #keystore.path: certs/transport.p12
  #truststore.path: certs/transport.p12
  keystore.path: /etc/elasticsearch/certs/elastic-certificates.p12
  truststore.path: /etc/elasticsearch/certs/elastic-stack-ca.p12
更新es的keystore
Elasticsearch 使用单独的密钥库来保存密钥库和信任库的密码,这些密钥库和信任库保存了在前面步骤中创建的 CA 和节点证书。通过使用elasticsearch-keystore 来访问此密钥库。以下命令列出现有的密钥库内容
/usr/share/elasticsearch/bin/elasticsearch-keystore list
现在需要删除上面的默认传输层密钥库和信任库。
/usr/share/elasticsearch/bin/elasticsearch-keystore remove xpack.security.transport.ssl.keystore.secure_password

/usr/share/elasticsearch/bin/elasticsearch-keystore remove xpack.security.transport.ssl.truststore.secure_password
更新成我们前面自己生成的
[root@es-2-100 certs]# /usr/share/elasticsearch/bin/elasticsearch-keystore add xpack.security.transport.ssl.keystore.secure_password
Enter value for xpack.security.transport.ssl.keystore.secure_password:

[root@es-2-100 certs]# /usr/share/elasticsearch/bin/elasticsearch-keystore add xpack.security.transport.ssl.truststore.secure_password
Enter value for xpack.security.transport.ssl.truststore.secure_password:
给HTTP层生成证书
与传输层的过程类似,在 Elasticsearch 集群的第一个节点上,使用 elasticsearch-certutil程序生成用于 HTTP 通信的 CA 证书:
[root@es-2-100 certs]# /usr/share/elasticsearch/bin/elasticsearch-certutil http
Generate a CSR? [y/N]n
Use an existing CA? [y/N]y   #使用已经存在的CA证书
CA Path: /etc/elasticsearch/certs/ca/ca.crt  #写入之前生成的CA证书的路径
CA Key: /etc/elasticsearch/certs/ca/ca.key
For how long should your certificate be valid? [5y] 10y  # 设置过期时间,这里设置为10年
Generate a certificate per node? [y/N]y   # 为每个节点生成证书
node #1 name: node-1  # 节点1名称
Enter all the hostnames that you need, one per line.
When you are done, press <ENTER> once more to move on to the next step.

es-2-100   # 键入节点1的主机名,按回车键下一行,再按回车键结束配置

You entered the following hostnames.

 - es-2-100

Is this correct [Y/n]Y  # 确认配置
Enter all the IP addresses that you need, one per line.
When you are done, press <ENTER> once more to move on to the next step.

10.0.2.100 # 键入节点1的IP,按回车键下一行,再按回车键结束配置

You entered the following IP addresses.

 - 10.0.2.100

Is this correct [Y/n]Y # 确认配置
#### Other certificate options
Key Name: node-1
Subject DN: CN=node-1
Key Size: 2048

Do you wish to change any of these options? [y/N] N # 需要不需要对其他选项进行修改,这里确认了就不修改了
Generate additional certificates? [Y/n]Y  # 是否继续生成证书,如果是集群,那么每个节点都要生成,重复上面的过程即可
.....
Generate additional certificates? [Y/n]n  # 我这里已经生成了3个节点的证书了

## What password do you want for your private key(s)?

Your private key(s) will be stored in a PKCS#12 keystore file named "http.p12".
This type of keystore is always password protected, but it is possible to use a
blank password.

If you wish to use a blank password, simply press <enter> at the prompt below.
Provide a password for the "http.p12" file:  [<ENTER> for none]  # 为新生成的http密钥库文件提供一个密码,这个后面更新密钥库的时候需要使用

## Where should we save the generated files?

A number of files will be generated including your private key(s),
public certificate(s), and sample configuration options for Elastic Stack products.

These files will be included in a single zip archive.

What filename should be used for the output zip file? [/usr/share/elasticsearch/elasticsearch-ssl-http.zip]

Zip file written to /usr/share/elasticsearch/elasticsearch-ssl-http.zip
备份当前密钥库
mv /etc/elasticsearch/certs/http.p12 /etc/elasticsearch/certs/http-old.p12解压新的密钥库到指定文件夹下
mv  /usr/share/elasticsearch/elasticsearch-ssl-http.zip  /etc/elasticsearch/certs

[root@es-2-100 certs]# unzip elasticsearch-ssl-http.zip
Archive:  elasticsearch-ssl-http.zip
   creating: elasticsearch/
   creating: elasticsearch/node-1/
  inflating: elasticsearch/node-1/README.txt
  inflating: elasticsearch/node-1/http.p12
  inflating: elasticsearch/node-1/sample-elasticsearch.yml
   creating: elasticsearch/node-2/
  inflating: elasticsearch/node-2/README.txt
  inflating: elasticsearch/node-2/http.p12
  inflating: elasticsearch/node-2/sample-elasticsearch.yml
   creating: elasticsearch/node-3/
  inflating: elasticsearch/node-3/README.txt
  inflating: elasticsearch/node-3/http.p12
  inflating: elasticsearch/node-3/sample-elasticsearch.yml
   creating: kibana/
  inflating: kibana/README.txt
  inflating: kibana/elasticsearch-ca.pem
  inflating: kibana/sample-kibana.yml
解压完成后,每个节点的证书配置都位于单独的文件目录里面
[root@es-2-100 certs]# ls -lR /etc/elasticsearch/certs/{elasticsearch,kibana}
/etc/elasticsearch/certs/elasticsearch:
total 0
drwxr-xr-x. 2 root root 72 Oct 11 15:20 node-1
drwxr-xr-x. 2 root root 72 Oct 11 15:20 node-2
drwxr-xr-x. 2 root root 72 Oct 11 15:20 node-3

/etc/elasticsearch/certs/elasticsearch/node-1:
total 12
-rw-r--r--. 1 root root 3620 Oct 11 15:20 http.p12
-rw-r--r--. 1 root root 1091 Oct 11 15:20 README.txt
-rw-r--r--. 1 root root  658 Oct 11 15:20 sample-elasticsearch.yml

/etc/elasticsearch/certs/elasticsearch/node-2:
total 12
-rw-r--r--. 1 root root 3620 Oct 11 15:20 http.p12
-rw-r--r--. 1 root root 1091 Oct 11 15:20 README.txt
-rw-r--r--. 1 root root  658 Oct 11 15:20 sample-elasticsearch.yml

/etc/elasticsearch/certs/elasticsearch/node-3:
total 12
-rw-r--r--. 1 root root 3620 Oct 11 15:20 http.p12
-rw-r--r--. 1 root root 1091 Oct 11 15:20 README.txt
-rw-r--r--. 1 root root  658 Oct 11 15:20 sample-elasticsearch.yml

/etc/elasticsearch/certs/kibana:
total 12
-rw-r--r--. 1 root root 1200 Oct 11 15:20 elasticsearch-ca.pem
-rw-r--r--. 1 root root 1306 Oct 11 15:20 README.txt
-rw-r--r--. 1 root root 1057 Oct 11 15:20 sample-kibana.yml
替换现有的
http.p12
cp -rf /etc/elasticsearch/certs/elasticsearch/node-1/http.p12 /etc/elasticsearch/certs/再次更新节点配置文件
/etc/elasticsearch/elasticsearch.yml
# Enable encryption for HTTP API client connections, such as Kibana, Logstash, and Agents
xpack.security.http.ssl:
  enabled: true
  #keystore.path: certs/http.p12
keystore.path: /etc/elasticsearch/certs/http.p12跟传输层一样,由于我们对http的密钥库的密码也进行了更新,所有需要手动命令更新密钥库的密码。这里的密码更前面生成
http.p12文件输入的秘钥必须一致
[root@es-2-100 elasticsearch]# /usr/share/elasticsearch/bin/elasticsearch-keystore remove xpack.security.http.ssl.keystore.secure_password
[root@es-2-100 elasticsearch]# /usr/share/elasticsearch/bin/elasticsearch-keystore add xpack.security.http.ssl.keystore.secure_password
Enter value for xpack.security.http.ssl.keystore.secure_password:
最后修改文件权限
chown -R root:elasticsearch /etc/elasticsearch/certs/
chmod 640 /etc/elasticsearch/certs/elastic-certificates.p12
chmod 640 /etc/elasticsearch/certs/elastic-stack-ca.p12
chmod 640 /etc/elasticsearch/certs/http_ca.crt
chmod 640 /etc/elasticsearch/certs/http.p12
chmod 750 /etc/elasticsearch/certs
chmod 750 /etc/elasticsearch/certs/ca
重启es服务
systemctl start elasticsearch.service
systemctl status elasticsearch.service
重启的试试可以查看节点启动日志
tail -f /var/log/elasticsearch/elasticsearch-node-1.log

#出现下面的数据表示ssl配置成功
[2023-07-12T13:11:29,154][INFO ][o.e.x.s.Security         ] [es-ssl-test] Security is enabled
作用于其他节点
备份http.p12文件
mv http.p12 http-old.p12复制您在第一个 Elasticsearch 节点上生成的 CA 和信任库文件,以便它们可以在所有其他节点上重复使用:
将第一个 Elasticsearch 节点上的目录
/etc/elasticsearch/certs/ca(包含ca.crt和ca.key)复制到所有其他 Elasticsearch 节点上的相同路径。将文件
elastic-stack-ca.p12从/etc/elasticsearch/certs/复制到所有其他 Elasticsearch 节点上的/etc/elasticsearch/certs/目录将文件
http.p12从/usr/share/elasticsearch/elasticsearch目录中的每个节点目录复制到每个相应集群节点上的/etc/elasticsearch/certs/目录中。
停止节点es
sudo systemctl stop elasticsearch.service从
/etc/elasticsearch/certs目录中,为 Elasticsearch 节点创建一个新证书
/usr/share/elasticsearch/bin/elasticsearch-certutil cert --ca-cert /etc/elasticsearch/certs/ca/ca.crt --ca-key /etc/elasticsearch/certs/ca/ca.key
Please enter the desired output file [elastic-certificates.p12]: /etc/elasticsearch/certs/elastic-certificates.p12
Enter password for elastic-certificates.p12 :  #指定证书密码
更新配置文件
/etc/elasticsearch/elasticsearch.yml
# Enable encryption and mutual authentication between cluster nodes
xpack.security.transport.ssl:
  enabled: true
  verification_mode: certificate
  #keystore.path: certs/transport.p12
  #truststore.path: certs/transport.p12
  keystore.path: /etc/elasticsearch/certs/elastic-certificates.p12
  truststore.path: /etc/elasticsearch/certs/elastic-stack-ca.p12
查看密钥库
[root@es-2-101 ca]# /usr/share/elasticsearch/bin/elasticsearch-keystore list
keystore.seed
xpack.security.http.ssl.keystore.secure_password
xpack.security.transport.ssl.keystore.secure_password
xpack.security.transport.ssl.truststore.secure_password删除默认传输层密钥库和信任库的密码
/usr/share/elasticsearch/bin/elasticsearch-keystore remove xpack.security.transport.ssl.keystore.secure_password

/usr/share/elasticsearch/bin/elasticsearch-keystore remove xpack.security.transport.ssl.truststore.secure_password更新传输层密钥库和信任库密码
root@es-2-101 ca]# /usr/share/elasticsearch/bin/elasticsearch-keystore add xpack.security.transport.ssl.keystore.secure_password
Enter value for xpack.security.transport.ssl.keystore.secure_password:

/usr/share/elasticsearch/bin/elasticsearch-keystore add xpack.security.transport.ssl.truststore.secure_password
Enter value for xpack.security.transport.ssl.truststore.secure_password:
更新HTTP层
配置文件更新
/etc/elasticsearch/elasticsearch.yml
# Enable encryption for HTTP API client connections, such as Kibana, Logstash, and Agents
xpack.security.http.ssl:
  enabled: true
  #keystore.path: certs/http.p12
  keystore.path: /etc/elasticsearch/certs/http.p12
删除HTTP层密钥库和信任库密码
/usr/share/elasticsearch/bin/elasticsearch-keystore remove xpack.security.http.ssl.keystore.secure_password更新HTTP层密钥库和信任库密码
[root@es-2-101 ca]# /usr/share/elasticsearch/bin/elasticsearch-keystore add xpack.security.http.ssl.keystore.secure_password
Enter value for xpack.security.http.ssl.keystore.secure_password:
修改相关文件权限
chown -R root:elasticsearch /etc/elasticsearch/certs/
chmod 640 /etc/elasticsearch/certs/elastic-certificates.p12
chmod 640 /etc/elasticsearch/certs/elastic-stack-ca.p12
chmod 640 /etc/elasticsearch/certs/http_ca.crt
chmod 640 /etc/elasticsearch/certs/http.p12
chmod 750 /etc/elasticsearch/certs
chmod 750 /etc/elasticsearch/certs/ca
启动
systemctl start elasticsearch.service
systemctl status elasticsearch.service
Kibana证书安装
这里我们需要用到在es第一个节点上生成的elasticsearch-ssl-http.zip文件,移动该文件夹下kibana/elasticsearch-ca.pem到Kibana的配置文件夹中
unzip elasticsearch-ssl-http.zip
cp kibana/elasticsearch-ca.pem /etc/kibana
停止服务
systemctl stop kibana.service更新Kibana配置文件/etc/kibana/kibana.yml
#elasticsearch.ssl.certificateAuthorities: [/var/lib/kibana/ca_1729826434395.crt]
elasticsearch.ssl.certificateAuthorities: [/etc/kibana/elasticsearch-ca.pem] #设置
登录到第一个 Elasticsearch 节点,然后使用证书
elasticsearch-certutil工具为 Kibana 服务器生成证书捆绑包。此证书将用于加密 Kibana 和客户端浏览器之间的流量。在命令中,将 <DNS 名称> 和 <IP 地址>替换为 Kibana 服务器主机的名称和 IP 地址:
[root@es-2-100 ~]#  sudo /usr/share/elasticsearch/bin/elasticsearch-certutil cert --name kibana-server --ca-cert /etc/elasticsearch/certs/ca/ca.crt --ca-key /etc/elasticsearch/certs/ca/ca.key  --dns <DNS name> --ip <IP address> --pem

Please enter the desired output file [certificate-bundle.zip]:

Certificates written to /usr/share/elasticsearch/certificate-bundle.zip将生成的/usr/share/elasticsearch/certificate-bundle.zip文件复制到kibana中
使用上面生成的证书
[root@kibana-2-105 ~]# unzip certificate-bundle.zip
Archive:  certificate-bundle.zip
   creating: kibana-server/
  inflating: kibana-server/kibana-server.crt
  inflating: kibana-server/kibana-server.key

[root@kibana-2-105 ~]# cd kibana-server/

[root@kibana-2-105 kibana-server]# ls
kibana-server.crt  kibana-server.key

[root@kibana-2-105 kibana-server]# cp kibana-server.crt /etc/kibana/
[root@kibana-2-105 kibana-server]# cp kibana-server.key /etc/kibana/
更改证书权限
chmod 640 /etc/kibana/*.crt
chmod 640 /etc/kibana/*.key
再次修改kibana配置文件
/etc/kibana/kibana.yml
server.ssl.certificate: /etc/kibana/kibana-server.crt
server.ssl.key: /etc/kibana/kibana-server.key
server.ssl.enabled: true
为确保 Kibana 会话不会失效,请通过将 32 个字符或更长的字符串分配给 xpack.security.encryptionKey 设置来设置加密密钥(此字符串将kibana.yml配置,无需记住)。要生成随机字符串,您可以使用以下 bash 命令:
[root@kibana-2-105 kibana-server]# cat /dev/urandom | tr -dc 'a-z0-9' | fold -w 32 | head -n 1
z0tad0v7fsjqpimgpnqmqev1j43g3o5n
将生成的随机字符串配置到Kibana配置文件中
xpack.security.encryptionKey: z0tad0v7fsjqpimgpnqmqev1j43g3o5n最后重启Kibana服务器
systemctl start kibana.servicefleet Server证书生成
同样登录到第一个 Elasticsearch 节点,然后使用证书
elasticsearch-certutil工具为 fleet服务器生成证书捆绑包。此证书将用于加密 Kibana 和客户端浏览器之间的流量。在命令中,将 <DNS 名称> 和 <IP 地址>替换为 fleet服务器主机的名称和 IP 地址:
[root@es-2-100 ~]#  sudo /usr/share/elasticsearch/bin/elasticsearch-certutil cert --name fleet-server --ca-cert /etc/elasticsearch/certs/ca/ca.crt --ca-key /etc/elasticsearch/certs/ca/ca.key  --dns <DNS name> --ip <IP address> --pem

Please enter the desired output file [certificate-bundle.zip]: fleet-cert-bundle.zip  #这里我们修改一下文件名区分,用于区分
在fleet server服务上创建一个文件夹
mkdir /etc/fleet
# 将fleet-cert-bundle.zip中的key和crt复制到/etc/fleet中
unzip fleet-cert-bundle.zip
cp fleet-server/fleet-server.crt /etc/fleet/
cp fleet-server/fleet-server.key /etc/fleet/
将es第一个节点中
ca.crt文件复制到/etc/fleet文件夹下,并重命名为es-ca.crt用于区分,更改文件权限
chmod 640 /etc/fleet/*.crt
chmod 640 /etc/fleet/*.key
安装fleet server,见1.4
Fleet Server 集群搭建时,关于证书配置,域名是否使用同一个取决于你的部署架构。以下几种情况需要考虑:
1. 单个 Fleet Server:
如果只有一个 Fleet Server,那么所有 Agent 都连接到这一个 Server,证书的域名就使用这台 Server 的域名或 IP 地址即可。命令中使用的
--fleet-server-cert,--fleet-server-cert-key和--certificate-authorities参数就是用于配置 Fleet Server 的证书,确保 Agent 可以安全地连接到它。2. 多个 Fleet Server,负载均衡器:
如果部署了多个 Fleet Server 并使用负载均衡器,那么证书的域名应该使用负载均衡器的域名。Agent 连接到负载均衡器,负载均衡器再将请求分发到后端的 Fleet Server。这种情况下,
--fleet-server-cert和--fleet-server-cert-key参数应该配置负载均衡器的证书。3. 多个 Fleet Server,直接连接:
如果部署了多个 Fleet Server,并且 Agent 需要直接连接到特定的 Fleet Server(例如,基于地理位置或其他策略),那么每个 Fleet Server 都需要配置自己的证书和域名。Agent 在注册时需要指定要连接的 Fleet Server 的域名或 IP 地址。这种情况下,你需要为每个 Fleet Server 生成不同的证书,并在 Agent 的配置中指定相应的域名或 IP 地址。
1.4 安装fleet server
快速安装
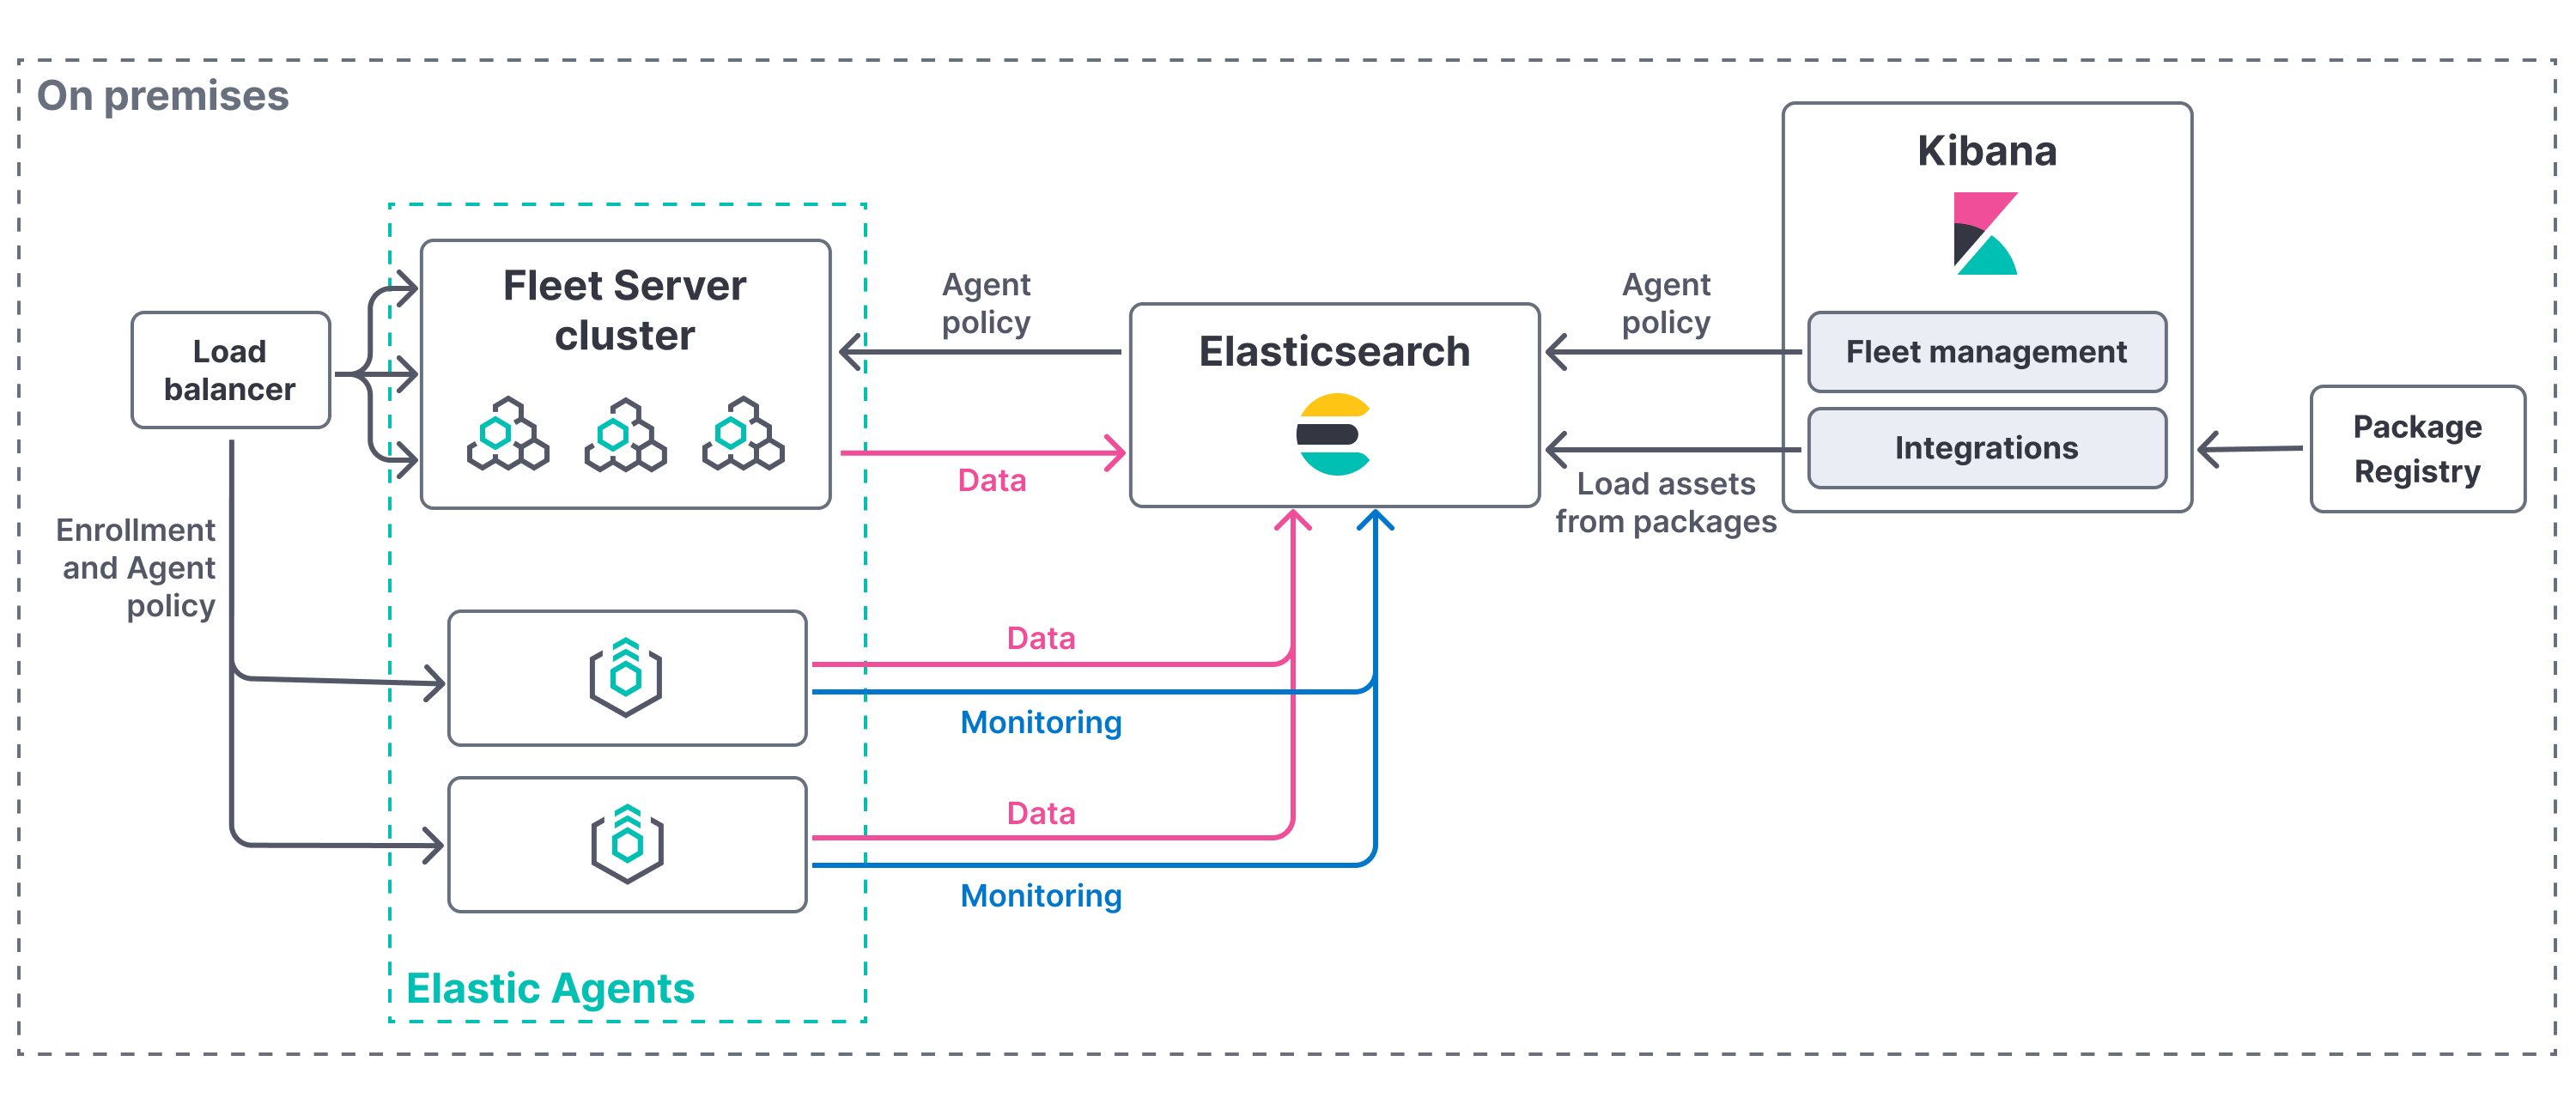

安装提示在一台服务器上安装fleet-server即可(这里使用的安装包和agent是一个,只是安装方式不一样而已)

成功完成安装

生产环境(自签名)安装
elastic-agent 安装参数中
fleet-server-es-ca-trusted-fingerprint选项需要的es证书指纹需要进行修改,Kibana直接提供的无效。 在第一个es节点中使用如下命令获取ca证书的指纹信息
[root@es-2-100 ~]# grep -v ^- /etc/elasticsearch/certs/ca/ca.crt | base64 -d | sha256sum
f4260da774e8f05c6c37da75d83ca5a825a933fc00d4376c1a90f7fc561a7b85  -
安装,记得替换
fleet-server-es-ca-trusted-fingerprint选项的值。 这里需要用到前面fleet server证书生成章节中的证书和秘钥。
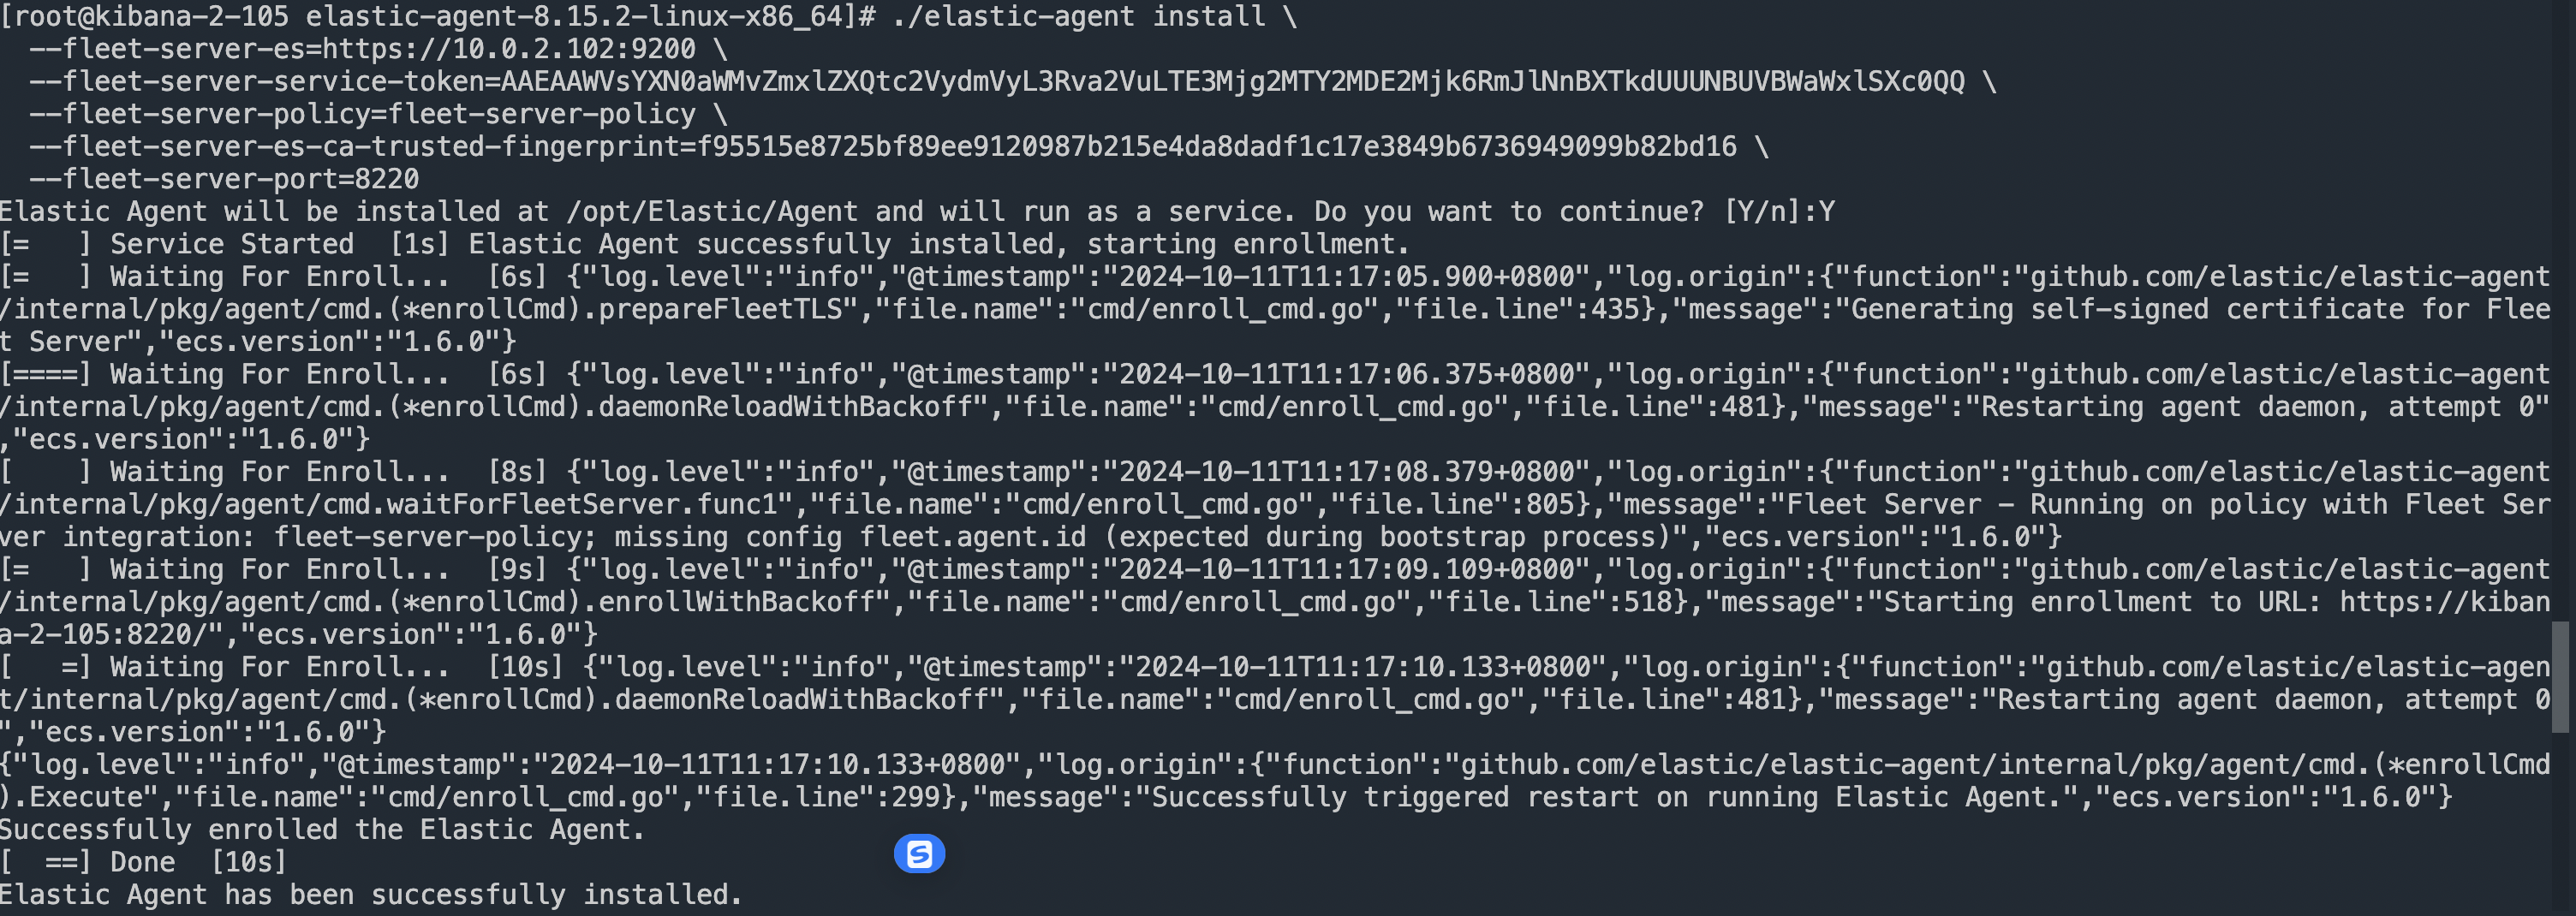
sudo ./elastic-agent install -url=https://10.128.0.208:8220 \
  --fleet-server-es=https://10.128.0.84:9200 \
  --fleet-server-service-token=AAEAAWVsYXN0aWMvZmxlZXQtc2VydmPyL6Rva2VuLTE5OTg4NzAxOTM4NDU6X1I0Q1RrRHZTSWlyNHhkSXQwNEJoQQ \
  --fleet-server-policy=fleet-server-policy \
  --fleet-server-es-ca-trusted-fingerprint=f4260da774e8f05c6c37da75d83ca5a825a933fc00d4376c1a90f7fc561a7b85 \
  --certificate-authorities=/etc/fleet/es-ca.crt \
  --fleet-server-cert=/etc/fleet/fleet-server.crt \
  --fleet-server-cert-key=/etc/fleet/fleet-server.key \
  --fleet-server-port=8220
1.5 安装agent
快速安装
根据提示完成安装即可
生产环境安装
在进行agent安装之前,需要先对kibana配置文件进行更新,主要是更新es ca证书的指纹。命令为
grep -v ^- /etc/elasticsearch/certs/ca/ca.crt | base64 -d | sha256sum
先停止kibana
systemctl stop kibana.servicexpack.fleet.outputs: [{id: fleet-default-output, name: default, is_default: true, is_default_monitoring: true, type: elasticsearch, hosts: [`https://10.128.0.84:9200`], ca_trusted_fingerprint: 92b51cf91e7fa311f8c84849224d448ca44824eb}] #更新这里ca_trusted_fingerprint的值,值更改为在es第一个节点中用命令grep -v ^- /etc/elasticsearch/certs/ca/ca.crt | base64 -d | sha256sum 获取到的值
完成更新后启动kibana
安装agent,需要在本地先存放
es-ca.crt文件(这个文件就是es第一个节点中的ca.crt文件),比如放在/etc/agent文件夹中。
 ./elastic-agent install \
--url=https://10.128.0.203:8220 \
--enrollment-token=VWCobFhKd0JuUnppVYQxX0VKV5E6UmU3BGk0ck9RM2HzbWEmcS4Bc1YUUM== \
--certificate-authorities=/etc/agent/es-ca.crt
参考
https://www.elastic.co/guide/en/elastic-stack/8.15/installing-stack-demo-self.html#install-stack-self-fleet-server